My Windows 10 Setup
Having not used Windows as my primary operating system in over a decade, I am keeping track of my new laptop setup to create a guide for myself for future Windows installs.
Initial Setup
- Run Windows Update
- Log in to GeForce Experience and update graphics drivers
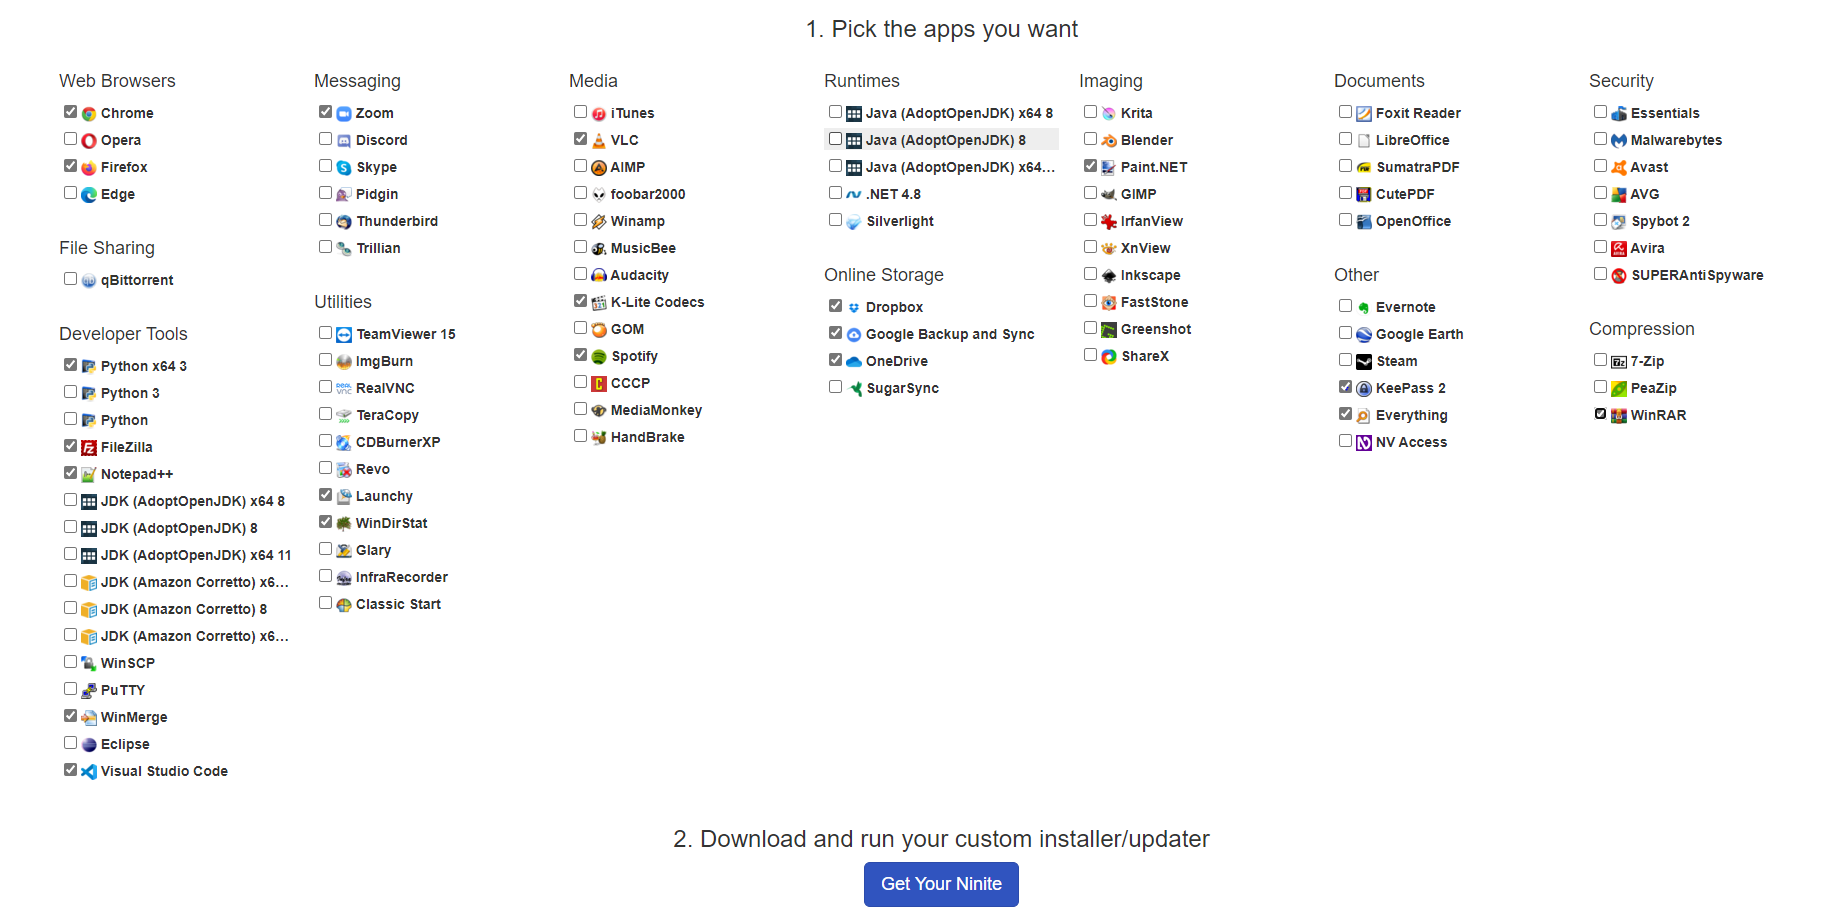
- Go to https://ninite.com and select the following apps — but do not install KeePass 2 from Ninite; get KeePassXC directly instead
Since this laptop is replacing my main desktop, the file transfer plan is to sync important folders and archive everything else to the NAS.
- Enable Dark Mode: go into Windows settings, search for “theme” or “dark mode”, and change the OS and app modes to dark mode.
- Install Slack — must sign in with all Slack accounts to regain access to all workspaces.
- Install SyncThing:
- Set “Ignore Permissions”. Open the SyncThing localhost GUI at
http://127.0.0.1:8384, click Actions → Settings → Edit Folder Defaults, change the default folder to the desired location, then click Advanced and check Ignore Permissions - Enable auto accept on linked devices to make sharing new folders easier
- Set “Ignore Permissions”. Open the SyncThing localhost GUI at
- If using KeePassXC portable version, pin to Start, launch the app, pin to taskbar.
- Install Lastpass Universal Windows Installer — must log into Lastpass on each browser
- Dual monitor setup: go to Display Settings, set monitors to extend instead of mirror. There is an area to position the screens correctly. The external monitor automatically uses its native pixel resolution.
- Install Logitech G HUB for mouse configuration
- Install WinGet and use it for all further app installations.
- For Launchy to detect a stand-alone program, right-click and Pin to Start
- To load a stand-alone program on system startup, open File Explorer, find the newly linked program under Start Menu and move the file link to
Start Menu\Programs\Startup - Disk Management formats newly installed hard drives
- WinStatDir analyzes disk usage
- Install Toolbox App from https://account.jetbrains.com
- Change preferences
Ctrl+Alt+Sto use WSL interpreter - Change terminal preference to
wsl.exeinstead ofcmd.exe
- Change preferences
- Turning off Windows Defender Firewall for WSL: see this GitHub issue — go to “Windows Defender Firewall Properties” → “Protected Network Connections” → Customize
Swapping Ctrl and Alt Keys
Swapping Ctrl and Alt keys to get a Mac-style keyboard layout:
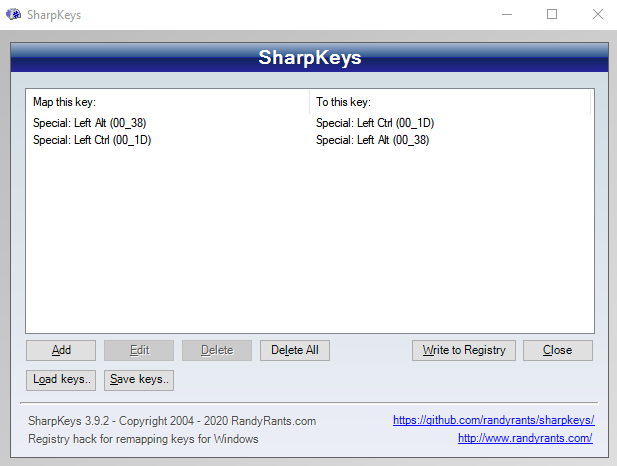
- Install SharpKeys and map Left Ctrl → Left Alt and Left Alt → Left Ctrl, then click Write To Registry, log out and back in.
Because SharpKeys is now transmitting Ctrl+Tab and Ctrl+Space where Alt+Tab and Alt+Space were expected, this introduces two noticeable issues:
- Alt+Tab breaks
- Alt+Space fails to bring up Launchy
The solution is to:
- Install AutoHotKey, pin it to Start, and move the link to the Startup folder
- Configure it with this AutoHotKey script
Install WSL 2 with Ubuntu Linux
Follow the official Microsoft guide and remember to set WSL to version 2. Ubuntu Linux works well.
Visual Studio Code should prompt you to install the Remote - WSL extension automatically.
Ubuntu configuration:
# Open Ubuntu terminal
sudo apt install zsh silversearcher-ag unzip jq

# Install oh-my-zsh
sh -c "$(wget https://raw.github.com/ohmyzsh/ohmyzsh/master/tools/install.sh -O -)"
Copy over your .zshrc from dotfiles. Entering code . from the Ubuntu terminal will open a new VSCode instance at that location.
Scott Hanselman’s 2021 Ultimate Developer and Power Users Tool List for Windows is a great reference for what to install on Windows.